A Year of Ergonomics
At the beginning of 2025 I decided that I would spend this year trying to improve my working space. Last year I transitioned from hybrid to fully remote work, and I also started noticing that years of sitting in front of the computer are catching up to me. Hence, I figured I should address this before things become too bad.
I had a few ideas going into this endeavour, however my two biggest areas of focus were posture and movement. I had seen a few of my colleagues use standing desks and treadmills with good success to put in a little bit of physical activity during meetings and I figured it should not be that hard to do this myself as well.
The budget for this project was basically unlimited. Overall, I ended up buying five products that became a part of my daily routine and are used every day. I think all of them are worth the money and overall I am very happy with the desk setup that I have now.
Note: none of this was sponsored and none of the links are affiliate links. No one had any influence on the content of this post. The prices listed are in zł (PLN), at the time of writing $1 is 3.63zł and €1 is 4.23zł.
Desk
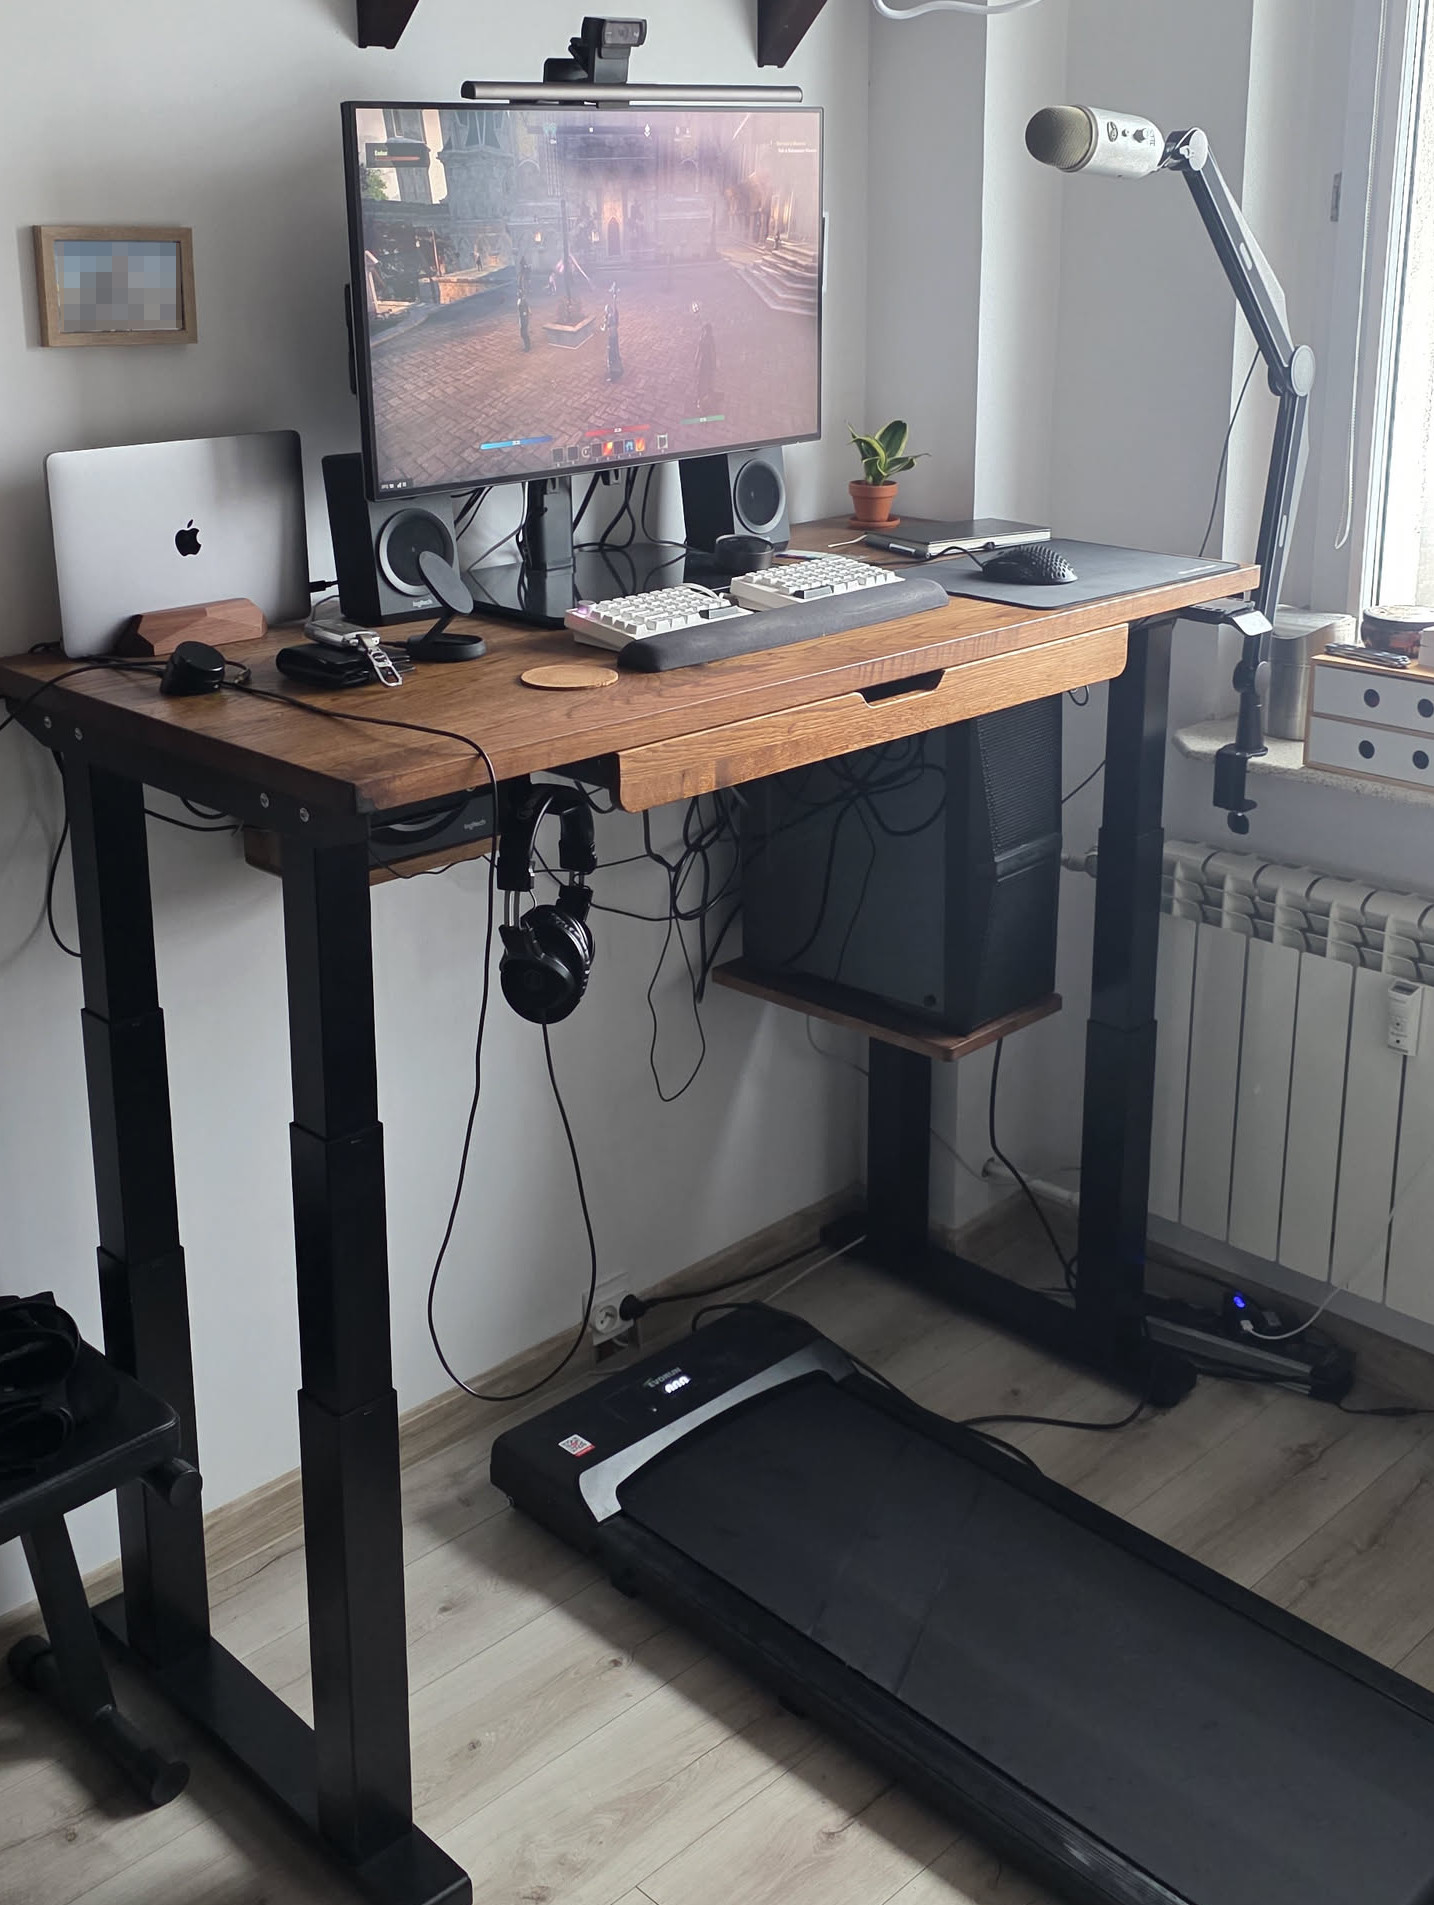
One of the first things I bought this year was a standing desk. I bought it from a local furniture manufacturer in Poland who builds custom desks with add-ons based on Linak frames. I didn’t think my needs were particularly elevated, since my study is not very large and can fit at most a 140cm-wide desk. I didn’t think I would need a particularly expensive frame because of it, so I opted for the cheapest one which turned out to be Linak Desk Frame 2.
As for the customisation options I ended up with a drawer, pop-up socket, subwoofer shelf, computer shelf, headphones hook, power strip, and a few hooks for cable management. The desk top is a 140x60cm oak wood block.
Now, this is just the beginning of a months-long desk saga. The desk arrived to me at the beginning of April, and while the aesthetic quality of it was unparalleled, the actual quality left a lot to be desired. The desk was two-legged, and when extended all the way up it wobbled to the point of being pretty much unusable. I complained to the seller about it and asked for tips, and I was told that this is what most two-legged desks do and there isn’t much that he can help with, though using a better monitor stand would help with comfort, so that the wobble wouldn’t be transferred to the screen as easily.
At the time I had two cheap Philips 4K 27” IPS monitors that did not have the standard VESA mounts, so in order to use a different stand, I would have to get a new display. I wanted to get rid of this pair anyway, so I ended up getting a new Dell 32” display. More on the display itself later, but I also ended up testing two different stands.
The first one, from a Chinese brand Hemudu, is widely recommended because of this YouTube video, however, it does not solve the problem at all, since the stand has quite a few “adjustment” options that transfer the wobble. The second one that I got (and which I’m using now) is this one, which is a much larger and sturdier TV stand, but it is completely solid and there is no movement on it at all. The downside of course is that there is no on-the-fly adjustment beyond small horizontal tilt, but that’s precisely why I am happy with it.
Unfortunately, though, that did not eliminate the problem of the wobble entirely and it was still very difficult to focus on work while the desk was up at the standing position. Even while sitting, I have a habit of rocking my leg and this also caused the desk to wobble. In the meantime, I chanced upon two much cheaper standing desks in the wild and to my surprise they barely wobbled. It was still noticeable, but in my view acceptable for use. I contacted the seller again with my findings and asked if there is anything he could do to help out, since it was not a good look that desks for a fifth of the price were more stable than a bespoke piece of furniture.
The seller said that I could purchase their top-of-the-line four-legged frame, and refund the two-legged one. Unfortunately, this was not that easy, since the pop-up socket collided with one of the legs.
After a pretty lengthy back-and-forth, around the end of August we agreed that I would purchase a four-legged frame, and the seller would include a new desk top that would fit all the existing accessories (except the pop-up socket).
I got the new desk in mid-November, and after putting it together it wobbled again, even more than the previous desk. I looked into the manual for the frame (which this time turned out to be a set of four Linak DL19 columns) and it turned out that Linak recommends1Marginnote linak1“Sufficient stability of the desk is only obtained if all six M6 screws are used for mounting the motor housing on the top frame. Tests with fixing the motor housing using only four M6 screws have proved that the torsional stability of the desk is insufficient.” Linak DL19 manual. ↩ that the columns be mounted on six screws each to guarantee stability. The design made by the seller included two mount points for the front columns and four mount points for the rear. On top of that, the mount points were uneven—they were to be screwed to metal cantilevers that go along the sides of the desk, and did not sit flush with the top of the desk, with half of the column floating in the air.
Understandably upset I contacted the seller once again, letting him know that my patience is running very thin, and that I expect to have a stable desk by the end of the year. After some nagging, the seller sent six missing angle bars that let me finally put the columns together in a way that conforms to the specification. This resolved the issue and now the desk is stable and I am very happy with it, though I wish I didn’t have to wait until December to say that.
I use the standing functionality pretty much every day for a few hours, especially during meetings. I think it’s a good purchase and it helps me not be in the same position all day.
Takeaways
Stability, not carry weight or anything else, is the most important factor when picking out a standing desk. I would avoid any 2-legged models and instead focus only on 4-legged frames if you have no other way of preventing wobble such as wedging it into a corner or mounting the monitor on the wall.
Price: 5195zł for the first desk and add-ons + 4200zł for the second - 2350zł refund + about 40 hours spent on assembling, disassembling, carrying and emailing.
Treadmill
The second part of getting some movement in during the work day, next to the standing desk, is a treadmill. Unfortunately, while standing desks have some recognisable brands (like Linak, Uplift, Flexispot or Deskhaus), treadmills are mostly the same white-labelled stuff made in three factories in China and shipped to retailers in the west. As such, there is no way to tell that the thing you’re buying is any good, because matching models to reviews is basically impossible. There is no Apple treadmill, or a Dyson treadmill, that one could expect to be reasonably good without doing copious amounts of research and matching images of products to their sources on Taobao or Alibaba. (There is a Xiaomi sub-brand Kingsmith, but reportedly it’s not very good.) This mirrors what happened with self-balancing scooters around 2015, as Rory Sutherland describes in Alchemy:
In the absence of recognisable brands, it was impossible to make sense of the category. (…) We felt uneasy buying something that costs a few hundred pounds without the reassurance of a recognisable name (…) because we intuitively understand that someone with a reputable brand identity has more to lose from selling a bad product than someone with no reputation at risk. Had there been a Samsung, LG, or Dyson hoverboard on offer, you very well might have bought one.2Marginnote alchemy2Sutherland, R. Alchemy: The Surprising Power of Ideas That Don’t Make Sense. W. H. Allen 2020; pp. 206-7 ↩
This is even more evident in Europe, since many reviews are for products only distributed in the U.S. and available only on Amazon there. There is a Google doc that circulates around the /r/WalkingPads subreddit, but many of the models are not available here, and I hadn’t known about it before I bought the treadmill.
I ended up buying a cheaper walking pad from a local supplier which is very clearly a white-labeled product, though I’m unsure what the model is called elsewhere. Here, my only serious limitations were portability and weight tolerance above 110kg. While this model is fairly portable and advertises weight tolerance up to 120kg, after using it very briefly the belt started skipping and the motor clearly was giving out. I had it replaced on warranty, and so far it seems to work okay, but I’m entirely expecting it to become e-waste soon and I will invest in something a bit more long-lasting.
There is some maintenance to it to keep in mind, too, most importantly lubricating and tensioning the belt. It’s a good idea to get a bottle of silicone oil for treadmills alongside the treadmill itself, because while it says that it’s been done at the factory, the reality is there was still a lot of friction between the belt and the deck, so I had to put a lot more oil so that it ran smoothly (and the motor gave out eventually anyway). The tensioning also isn’t very good out of the box as evidenced by the belt being shifted to the side—this needs adjusting from time to time as well.
As for the use, since I didn’t have a good desk for a long while I don’t have much to report here, but I know a few of my friends and colleagues use them regularly and swear by them. My only recommendation would be to avoid using it during meetings with people you don’t know yet, such as sales calls—walking endlessly at the camera can seem a bit intimidating.
Takeaways
It’s almost impossible to buy a good treadmill, and it has to be maintained regularly. Take care to buy one with tolerance at least 20kg above your weight so that the motor doesn’t give out.
Price: 999zł
Monitor
As I mentioned before, I had previously used a pair of 4K 27” 60Hz Philips IPS displays, which were basically the cheapest 4K monitors that I could have bought at the time (mid-2019). I expected there to have been some improvements in monitor technology since then, so I looked around for a few alternatives.
My first decision was ditching two monitors and opting for a single one, either a 21:9 or a larger 32” 16:9. For most of my work I use a tiling window manager (i3 on Linux, Aerospace on Mac) and I found that a second monitor is rarely a productivity boost, but more often a source of distraction. When I’m working on multiple things at the same time, I find it much quicker to switch between workspaces with a button press rather than move my head around. After a few months of using a single monitor, I find that hypothesis completely validated and I don’t really miss the second monitor.
One important question that I had to research was the quality of text on OLED monitors, versus IPS (other matrix types weren’t really in consideration). I do some gaming from time to time, but I spend most of my time working with text in the terminal and text editor, so any compromise on that front was unacceptable, especially since I was already used to working with a 4K display which I used at 200% UI scaling.
OLED displays have some advantages, notably higher refresh rates, better contrasts and deeper blacks, but they compromise at text clarity because they don’t have square pixels. In IPS displays, the subpixels (the red, green and blue components that make up a single pixel) are rectangles that together add up to make a single square pixel that we perceive as being a specific colour. OLED displays lay them out in a different pattern, usually a triangle, though there are variations.
The IPS subpixel layout is so ubiquitous that there are many software solutions that take advantage of that fact, notably FreeType and Microsoft ClearType font rasterisation libraries, which are used to render text more clearly by utilising subpixel rendering. When switching to a display that does not use standard subpixel layout, the settings for these libraries need to be adjusted, otherwise a phenomenon called “colour fringing”3Marginnote fringing3For a detailed breakdown of why that happens and some pictorial examples of what the different matrices look like, you can check out this article. ↩ occurs, which makes the individaul subpixels “bleed” onto neighbouring pixels.
Initially, I was under the impression that inferior OLED text clarity is a software issue, and so opted for a curved 1440p 21:9 panel from MSI. After I received it, I tested multiple things to resolve text quality issues—installed the freetype2-qdoled config from the AUR, recompiled FreeType with patches for OLED subpixel layout, changed smoothing to grayscale, turned smoothing off completely—and nothing got me to a point where my eyes didn’t hurt after twenty minutes of looking at text. I returned it (thank you x-kom for your very generous return policy!) and replaced it with my current 32” 4K 16:9 Dell display, that I use at 150% UI scaling and I am very happy with it.
(I should admit that the MSI was very good in games, the image quality was perceivably better than IPS in Oblivion Remastered, but the text clarity issue was a deal-breaker.)
If I were to nitpick, there are a few things about it that are sub-par: the automated brightness sensor seems to have been calibrated on office lights and as such is incredibly aggressive with no way to tweak it manually, the included stand is laughably bad, and the included cables are very short. But apart from these minor things, it’s an excellent monitor that I am very happy with.
Since it comes with a built-in KVM switch, I adjusted my workflow to let me switch all of my peripherals between my Linux PC and Macbook, and it’s completely seamless. I am very happy with it and would definitely recommend it (Dell also has a 21:9 model on a similar panel, but it’s far more expensive).
Takeaways
OLED needs a lot higher pixel density to not compromise on text quality, since the current subpixel rendering solutions aren’t very good. IPS is still very good for working with text.
Price: 4449zł
Screenbar
This is something that I saw on many people’s setups and never quite understood what it’s for until I actually tried it myself. A screenbar is a kind of desk lamp that hangs above the monitor and creates a very focused cone of light between the surface of the monitor and eye level.
The point is to illuminate the desk without creating glare on the display and without blinding the user. Many models also include a secondary diffusion lamp to put some background light behind the monitor so that the contrast between the screen and the wall is not so exhausting.
My first foray here was a cheap model from Baseus, however I quite quickly realised that while the idea has merit, that particular model doesn’t work for my use case because my monitor was quite high up and so there was no way to set it up so that it both didn’t glare and didn’t blind me. I ended up returning it and exchanging it for a higher-end BenQ Halo 2.
That one has a wireless puck, fine-grained colour temperature and intensity controls, favourites, automatic intensity adjustment and presence detection. When I told my wife that I had spent that much on a desk lamp she thought I was crazy, but I think it’s really worth it if you don’t have any specific needs that this lamp doesn’t fulfill (for example you don’t want to have another wireless thing on your desk, or you want to control your lamp remotely via some kind of smart home integration).
There are a couple of flaws: while the puck’s dial is very satisfyingly analogue, all the controls are touch-based, and the surface attracts fingerprints like nothing else. It would be really nice if the buttons were physical instead. Also, the automatic intensity adjustment doesn’t allow the user to choose preferred colour temperature, always defaulting to 4000K, which is not my favourite choice.
Takeaways
It creates a beautiful ambiance around my desk and I pretty much completely retired all other light sources from my study apart from the overhead lights. While the price is very steep, I’m sure there are some cheaper models that get you 90% of the way there.
Price: 799zł
Keyboard
I’ve used many mechanical keyboards for the past ten years, but all of them have been quite conventional. My first “serious” mechanical keyboard was the original, full-size GMMK Pro with Kailh Box White switches and some artsy Cherry profile keycaps from Aliexpress. Last year I switched to a low-profile Lofree Flow100, which remains my favourite conventional mechanical keyboard (though if I were to choose again, I would forgo the numpad in favour of more desk space of the Flow84 model).
However, for quite some time I was very interested in ergonomic, split keyboards. For most of them, a significant deterrent is their price: ergonomic keyboards typically have some curves that make automated manufacturing difficult, so they have to be soldered manually which drives up the manufacturing costs very high. Classics like Kinesis Advantage or Glove80 can cost upwards of 1500zł shipped to Europe, which is decidedly much more than I’m prepared to spend on a keyboard, especially one that I’m not sure that I like.
Some time ago on Twitter (currently X) I saw a post suggesting the aptly-named, open-source Cheapino as a good first step into the world of split keyboards and I gave it a shot, ordering a pre-assembled board from Aliexpress. I documented my adventures in this thread.
In short, my conclusions after a few days of using the Cheapino were that the split factor was amazing (allowing me to recline and keep my back straight), but my hunch about column-stagger was proven correct—the layout is entirely unusable.
The idea behind column stagger is that since one’s fingers are more used to the up-down movement and typically side-to-side movement requires engagement of the wrist, the row staggered layout of the traditional QWERTY keyboards (tracing its lineage to typewriter levers which could not be directly under one another) is unergonomic. Instead, we should assign a column of keys to a finger, and have only that finger type those keys.
In theory this works great, in practice it absolutely does not. I am able to type at roughly 140wpm on a conventional keyboard and on the Cheapino I was able to exceed 100wpm with great difficulty. The problem is that at higher typing speeds, some complicated chords require typing letters that would normally be “assigned” to one finger (oftentimes these are common sequences of two letters, hence the name single finger bigrams or SFB).
For example, in the word “column” the last three letters should, according to the classic home row method, be typed with the right index finger. That takes a long time, so fast typists use a technique called “alternative fingering” which moves the entire hand to press some letters with fingers that are normally not assigned to them. In the word “column” one would normally press the keys O and L with the right ring finger, and the letters U M and N with the index finger. With alternative fingering, I turn my wrist slightly to the left and so end up pressing the sequence “olumn” with ring, pinky, middle, index, index fingers, respectively.
It turns out that classic, row-staggered layouts, while maybe less ergonomic and requiring more wrist movement, are also much easier to use the alternative fingering technique on. As such, they allow much faster typing compared to a column-staggered layout. There have been some attempts at designing keyboard layouts that minimise the occurrence of single finger bigrams for typists that use the home row method, however they require significant time investment to learn and are different for each language. Since I often type in three different languages within an hour, learning a new keyboard layout for each one of them is not feasible.
After a couple of weeks of struggling I sold the Cheapino on Facebook Marketplace and started looking for an alternative. It turned out that once you factor in the requirements of row stagger, split and arrow keys, there are very few options left, even fewer at a reasonable price. Fortunately I managed to find a model that satisfied these requirements, Zuoya GMK70. It came in barebones for quite cheap.
Unfortunately, split keyboards of this form-factor have one serious annoyance—it is practically impossible to find decent keycaps for them. Short of buying a custom set, one has to frankenstein a working setup from existing sets, or buy missing blank keycaps in the appropriate profile. I briefly used my old Cherry keycaps from the veritable GMMK, however since Cherry keycaps are profiled (meaning each row has a different shape), they cannot be as easily swapped to non-conventional positions on the keyboard. So to round out the keyboard, I got a new set of switches (Akko Creamy Purple Pro) and a new set of XDA keycaps from Aliexpress.
The GMK70 shares some layout quirks with the more popular Alice, for example two B keys, however it also has two, same-length (2.75u) space bars, while most Alice have them at different lengths. So on top of the full XDA set I also had to get two custom blanks for the space bars. Unfortunately, only Cherry profile blanks were available, though for space bars it’s not that big of a problem.
Finally, there is the matter of layout. I use the conventional QWERTY layout since that is what I’m most familiar with, but I made some tweaks specific to this keyboard to address some of the issues with its default layout. First, the Esc key is in a very odd place, because it shifts the entire number row on the left half to the right by one spot, leading to typos. I moved it to its appropriate position, instead opting to remove CapsLock from my keyboard entirely and replace it with Esc. The second significant change is that the two space bars are independently mappable, and I only ever use the left hand to type space, so I mapped the right one to Backspace. The original Backspace I instead remapped to Delete.
I am also very happy with the keyboard and I think it’s definitely worth the money. There is nothing that I dislike about it, though I do have a wishlist of things that are missing from it that I’d love to have in my perfect split keyboard: low profile, function keys, arrow keys, integrated wrist rests and backlight on the side rather than the top (like in Lofree keyboards).
Takeaways
Split keyboards are amazing at sorting out your posture, letting you expand your chest and keep your back straight. Column-staggered layouts aren’t any good for typing fast.
Price: 250zł for the keyboard + 65zł for keycaps + 148zł for switches